
 Free Source Library — Understanding how to set up mirror margins in Microsoft Word unlocks a vital aspect of professional document formatting, especially when preparing content for print and binding.
The Significance of Mirror Margins in Document Design
Mirror margins, also known as facing or reversed margins, serve a specific purpose in creating aesthetically balanced and functionally effective printed materials. Unlike standard uniform margins, mirror margins mirror the inside and outside margins of facing pages, meaning that the inside margin on the left page is larger or differently set than on the right page, creating a symmetrical layout when the pages are viewed in spreads. This technique is fundamental in publishing, academic manuscripts, thesis formatting, and professional book production. Mirror margins help ensure that the content area remains accessible and visually consistent across double-page spreads, especially once bound. They also assist in accommodating for binding methods such as saddle-stitching, spiral binding, or perfect binding—all of which require sufficient gutter space to prevent essential content from being lost or obscured. Properly applied mirror margins enhance not only the visual appeal but also improve readability and usability. This comprehensive guide explores every facet of setting up mirror margins in Microsoft Word—from the basic definitions to advanced techniques—equipping you with the knowledge to produce polished, publication-ready documents.
Understanding the Core Concepts
What Are Mirror Margins?
Mirror margins are a layout feature that ensures the margins on facing pages are set inversely, creating a mirror image. When the physical document is printed and opened as a spread, the margins synchronize in a way that looks harmonious and is easy to bind without content boundary issues. A typical setup includes: – **Inside margins**: Larger margins along the binding edge (left for odd pages, right for even pages) – **Outside margins**: Margins along the outer edges, usually narrower – **Gutter**: The additional space added to the inner margin to accommodate binding This arrangement maximizes the usable space on each page while maintaining visual symmetry.
Why Use Mirror Margins?
– **Professional Appearance**: Creates a balanced, book-like aesthetic, especially important in formal publications. – **Functional for Binding**: Ensures there is adequate space for binding, avoiding loss of critical content. – **Ease of Reading**: Facilitates a uniform reading experience across pages. – **Flexibility**: Suitable for complex documents with headers, footers, images, or columns that need consistent alignment.
When Should You Use Mirror Margins?
– When designing documents for print dissemination, such as reports, thesis, or booklets. – If the document will be physically bound, requiring specific gutter adjustments. – When aiming for a professional layout with facing pages. – For projects involving multiple sections or chapters that demand consistent formatting.
Setting Up Mirror Margins in Microsoft Word: Step-by-Step
The process for establishing mirror margins in Microsoft Word is straightforward but requires attention to detail to achieve optimal results. Here’s an expanded, step-by-step guide:
1. Accessing the Margins Settings
– **Open Your Document**: Launch Microsoft Word and open the document you wish to format. – **Navigate to the Layout Tab**: Depending on your version, this might be labeled as “Layout” or “Page Layout” on the ribbon. – **Click on Margins**: Locate the “Margins” button within the Page Setup group. Clicking it presents a dropdown menu with preset options.
2. Choosing Custom Margins
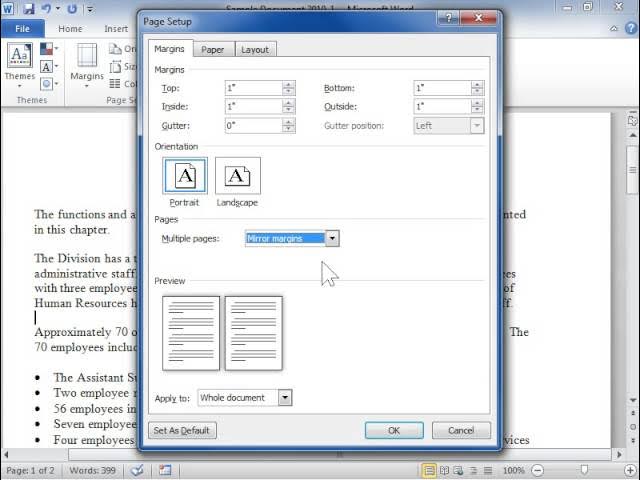
– **Select “Custom Margins…”**: Located at the bottom of the dropdown menu, this opens a detailed dialog box—”Page Setup”. – **Understanding the Dialog Box**: It is divided into sections for margins, orientation, paper size, layout, and multiple pages.
3. Activating Mirror Margins
– **Locate the “Multiple pages” Option**: Within the Page Setup dialog, find the dropdown menu associated with “Multiple pages”. – **Check the “Mirror margins” Box**: Selecting this option enables the inside/outside margin settings to automatically mirror across facing pages.
4. Adjusting Margins and Gutters
– **Set Margins**: – *Top and Bottom Margins*: Typically remain standard unless specific design needs dictate otherwise. – *Inside Margin*: Usually larger to accommodate binding; defaults may be 1-inch, but can be increased. – *Outside Margin*: Usually narrower, e.g., 0.75 inches. – **Configure Gutter**: – *Gutter Margin*: Adds additional space on the inside for binding—adjust according to the binding method (e.g., 0.2–0.5 inches). – *Gutter Position*: Usually set to “Left” for left-to-right languages, but can be “Top” or “Right” in specific scenarios.
5. Previewing the Layout
– The dialog box features a real-time preview pane showing how pages will look with the selected margins. – Use the preview to verify the symmetry and spacing.
6. Confirming the Settings
– Once satisfied, click “OK” to apply the mirror margin setup to the entire document. – Review the document pages to ensure layout consistency.
Advanced Considerations and Customizations
Establishing mirror margins goes beyond basic setup; understanding supplementary features enhances the professional quality of your document.
Using Sections for Complex Layouts
– Large or multi-part documents often require different margin settings per section. – Insert section breaks (section breaks) to apply unique formatting where needed. – Modify page setup for specific sections to have no mirror margins or customized margins.
Headers and Footers in Mirror Layouts
– Headers and footers can be aligned to match the mirrored pages. – Use “Different Odd & Even Pages” option in header/footer tools for distinct designs. – Insert page numbers, chapter titles, or branding that maintain consistency across spread.
Designing with Columns and Indents Synergistically
– Use the “Columns” feature for multi-column layouts aligned with mirror margins. – Incorporate “Mirror Indents” within paragraph formatting for symmetry.
Section Breaks and Orientation Management
– Combine orientation changes (portrait vs. landscape) with section breaks for complex designs. – Apply different margin or gutter settings to sections with different orientations.
Practical Applications and Case Studies
Real-world scenarios illuminate how mirror margins elevate document professionalism.
Case Study 1: Academic Thesis Formatting
– Universities often require double-sided printing with mirror margins. – The process involves setting custom margins, configuring gutter space for binding, and ensuring headers and footers align seamlessly. – Typically, margins are set to 1 inch outside and 1.25 inches inside, with a gutter of 0.5 inches. – Section breaks separate chapters, which include different page orientations or formatting.
Case Study 2: Designing a Booklet
– Booklet creation demands precise mirror margins for a clean, professional look. – Setting inside margins wider to account for binding, perhaps 1 inch, with outside margins narrow. – Incorporating mirror indents for chapter titles or glossary entries enhances aesthetic balance.
Case Study 3: Corporate Reports and Brochures
– These often contain headers, footers, and columns aligned across spreads. – Using mirror margins ensures visual coherence. – Additional design elements such as watermarks, images, and sidebars can be aligned with careful section management.
Common Mistakes and Troubleshooting
Achieving perfect mirror margins can sometimes be hindered by the following issues:
- Forgetting to update section breaks: Margins might not apply correctly across different sections if section breaks are not properly configured.
- Inconsistent header/footer settings: To maintain continuity, headers/footers must be set to “Same as Previous” or adjusted explicitly.
- Overlooking gutter space: Insufficient gutter space can cause binding issues or obscure content.
- Not previewing layout: Relying solely on defaults without preview can lead to misaligned pages.
- Orientation mismatches: Combining portrait and landscape pages requires thoughtful section breaks and individual margin settings.
**Solution tips:** – Always verify section break placements and their respective margin settings. – Use the “Print Preview” feature extensively before finalizing. – Adjust gutter dimensions based on actual binding method. – Maintain consistency in headers, footers, and margins across sections for uniformity.
Tools, Tips, and Additional Features
– **Using Templates**: Leverage professional templates designed with mirror margins for specific projects. – **Automating Margin Setup**: For large projects, consider macros or styles that facilitate consistent formatting. – **Third-Party Add-ins**: Some add-ins enhance margin management and layout review. – **Compatibility Considerations**: Ensure that exported or printed versions respect the set margins; test printouts are recommended.
Comparison of Margin Settings in Microsoft Word
| Margin Type | Default Setting | Suitable For | Boundary Adjustment | Compatibility with Binding | Ideal Use Cases | |—————————-|——————–|———————————————-|———————|—————————-|————————————————–| | Normal | 1 inch all around | General documents, digital sharing | No | No | Letters, memos, reports | | Mirrored (with Gutter) | Custom, mirror, yes| Booklets, manuscripts, theses | Yes, adjustable | Yes | Academic binding, professional publishing | | Custom | User-defined | Specific project needs, artistic designs | Flexible | Variable | Complex multi-section documents, cross-layouts |
Why Microsoft Word Is Suitable for Mirror Margins
Despite its reputation primarily as a word processor rather than a desktop publisher, Microsoft Word offers robust formatting capabilities that meet the needs of most document projects requiring mirror margins. Its intuitive interface, combined with advanced section management, header-footer options, and custom margin controls, makes it versatile enough for detailed professional formatting. While some high-volume publishing tasks or complex layouts might benefit from dedicated desktop publishing software like Adobe InDesign, Word remains a highly accessible, cost-effective choice—particularly for academic, corporate, and small-scale publishing.
Final Recommendations
– Always plan your document layout beforehand, considering gutter, header/footer placement, and section division. – Use section breaks strategically to manage different page orientations or specific formatting needs within the same document. – Regularly preview your layout during the setup process before finalizing. – Test print your document to confirm that margins, headers, footers, and binding allowances conform to expectations. – Maintain consistency in your formatting choices to ensure a cohesive professional appearance.
Additional Resources
References
- Microsoft Office Support. (n.d.). Set up margins for facing pages. Microsoft.
- Rudkin, J. (2021). Mastering Microsoft Word for Publishing. TechPress.